
DIY DSLR/Mirroless Camera Tap Housing
After building 10+ of these camera boxes for myself and a bunch of other folks, I figured I would finally try to document the whole process step by step and share it.
When you start camera trapping, you quickly figure out you can’t just duct-tape an expensive camera to a tree and cross your fingers. Once you’re leaving decent gear out in the woods, you want something that can actually take whatever Maine decides to throw at it—days of pouring rain, heavy wet snow, freezing nights that flip to hot and humid by afternoon, and every animal that wants to chew on it or knock it over.
The only off-the-shelf boxes out there are huge, bulky, way too expensive, and never as waterproof as they claim. I knew I could do better and cheaper myself, so I just started building my own.
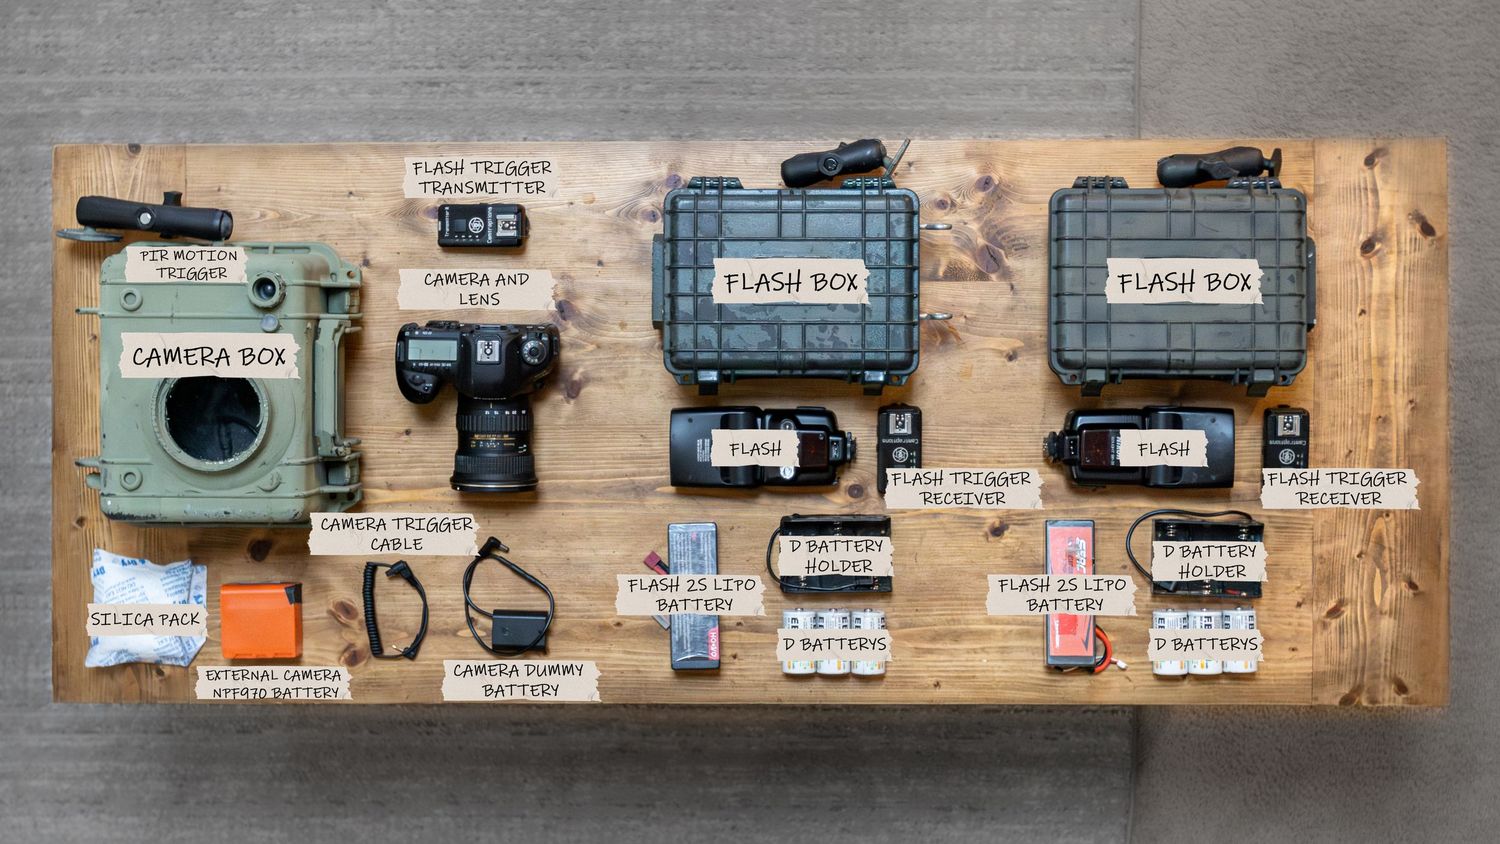
I've gone through 3 or 4 different versions over the last 5 years and finally landed on the one that does exactly what I need—efficient and cheap to build. The whole camera trap is based around a Pelican 1300 case, which is the sweet spot for fitting everything inside without having to stick some long extension tube out the front that could get wrecked by critters or banged around in the truck.
I use a Pelican case as the base—they’re built like tanks. I modify it so the inside stays bone dry no matter what the weather does. It works with pretty much any DSLR or mirrorless I’ve tried—Canon 5D series, Nikon D850, Sony a7, you name it.


Most of the work happens on the front of the box. I designed and 3D printed a lens mount that holds the front glass nice and tight. The filament I use can handle the temperature swings we get up here in Maine. After that, I screw in a big 95mm UV filter. Once the filter is screwed on, I seal it all with epoxy and then add a little lens hood to help keep snow and water off the glass.
Sealing is a big deal. Once the lens mount is printed and installed, I hit every gap around it and all the internal holes with several layers of good silicone. I let it cure completely, then spray the whole outside with a few coats of camo paint in regular Maine woods colors. It blends right into the brush, and the paint also helps protect against the sun and scratches.


Inside, I 3D print a custom riser with an Arca Swiss mount bolted to the floor. Makes it super easy to slide the camera in and out and lock it down quick, even in the rain. On top I add a 1-inch RAM ball mount so I can hang the box from a branch or strap however I need. That RAM ball almost makes it bear proof — stays rock solid even if the wind is blowing hard or something bumps it.
I also line the whole inside with closed cell foam. Helps insulate the camera and quiets down the shutter noise a bit. On the back door I mount an NP-F battery that keeps the camera running for a month or more, even in cold winter conditions.


I install a PIR sensor from another company that triggers the camera on movement, just like a regular game camera. Wires straight into the remote port and fires right when something walks by.


I also build matching boxes for the flashes. These use smaller Harbor Freight Apache 1800 cases with a simple 3D printed front lens mount. I ordered clear plexiglass from Send Cut Send and glue it into the 3D printed lens mount. I use the same 1 inch RAM mounts for mounting so I can put them anywhere. Same sealing process as the camera boxes — plenty of silicone, epoxy where it counts, and a coat of camo paint so they disappear into the woods right alongside the camera.
I’ve left these things out for months in some rough spots. Deep woods, game trails, places with bears and moose that like to check out anything new. So far they’ve handled -20°F nights and pouring summer rain without any leaks — unless a bear decides to have a say in it.
